Showing posts with label Coding. Show all posts

Install GO in UNIX/LINUX Environment

Go is a statically typed, compiled programming language designed at Google by Robert Griesemer, Rob Pike, and Ken Thompson. Follow the below steps to install it on you Linux/Unix Box :

  1. Download it from https://golang.org/dl/
$ curl -sSL https://golang.org/dl/goX.XX.X.linux-amd64.tar.gz -o goX.XX.X.linux-amd64.tar.gz

replace the X.XX.X with current version.

  1. Extract the downloaded file to /usr/local
$ sudo tar -C /usr/local -xzf goX.XX.X.linux-amd64.tar.gz
  1. Add the path /usr/local/go/bin to the environment variable, and for that just add the below lines to your .bashrc file, which is located on your home directory ~/.bashrc. Add below lines
export GOROOT=/usr/local/go
export GOPATH=$HOME/go
export PATH=$GOPATH/bin:$GOROOT/bin:$PATH

and now you are good to GO {he he !!}. Test the setup with go version

$ go version  
go version go1.15.3 linux/amd64

thats it.


Read more »

A Simple php script for Port Scanning

The below given php script scans open ports on target server. There are mainly two functions are used for scanning :

fsockopen() : The fsockopen() function is used to open socket connection with given hostname and port. Syntax :
 fsockopen(hostname, port, errNo, errStr, timeout);
getservbyport() : The getservbyport() function is used to get the service name which corresponds to supplied port and protocol. Syntax :
 getservbyport(portNumber, ProtocolName);
Read more »

Installing Python Interpreter in Windows 10

Python is a popular high-level programming language used for general purpose programming. But unlike Linux/Unix based operating systems, python interpreter does not come pre-packaged with windows 10. It means we have to install it by ourselves.

Installing python in Windows 10 in very easy, we just need to download the installer file and install it. You can download python interpreter for windows from below link :
Read more »

What is Base64 and How it works : Base64 Encoding/Decoding Guide for Beginners

Base64 is a mechanism to enable representing and transferring binary data over mediums that allow only printable characters. in other words Base64 is an encoding and decoding technique used to convert binary data to ASCII text format, and vice versa. Base64 encoding schemes are commonly used when there is a need to encode binary data that needs to be stored and transferred over media that are designed to deal with textual data. This is to ensure that the data remain intact without modification during transport. It is used to transfer data over a medium that only supports ASCII formats, such as email messages on Multipurpose Internet Mail Extension (MIME) and Extensible Markup Language (XML) data.

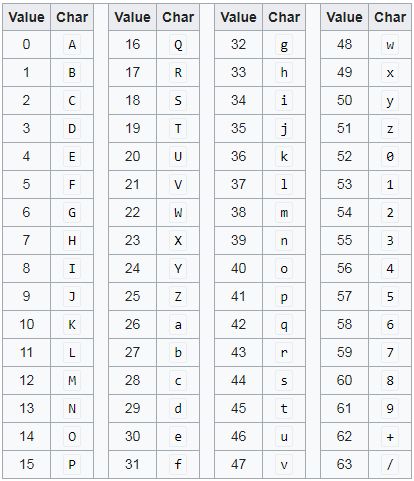
Base64 Encoding Table :

The Base64 alphabet contains a character set of 64 printable ASCII characters. The following set of characters is used to encode binary to text :


At the above table there are

  • A to Z characters  -  26 characters
  • a to z characters  -  26 characters
  • 0 to 9 - 10 characters
  • + (plus character)  - 1 character
  • / (forward-slash character)  -  1 character
  • = (equal character) - Used for Padding purposes, as explained later

Now here, since the numerals and alphabets make up for only 62 characters in all, so '+' and '/' are used to fill the gap. And also in Base64 the '=' sign is also used for filling purpose, which will explained below.


The Encoding Process :

  • 1. The Data is read from left to right.
  • 2. Three separate 8-bit data from the input are joined to make a 24-bit-long group.
  • 3. The 24-bit long group is divided into 6-bit individual groups, that is, 4 groups. The grouping into 6 bits is for the simple reason that 6 bits will cover the range of printable characters        [0-26-1 = 63]
  • 4. Each of these 4 groups of 6-bits is then encoded using the above-mentioned Base64 encoding table.
For more clarification of the Encoding process lets see the below exmaple where we encode the word 'Sec' :


Therefore, the Base64 equivalent for Sec becomes U2Vj.

Padding in Base64 :

However, a problem arises when the character groups are do not exactly form the 24-bit pattern. Consider the word Cloud, we cannot divide this word into 24-bit groups equally. Because theres only a single pair of 24-bit group (Clo), and the remaining characters 'ud', only create 16-bit. Now at here last 8-bit character is missing. Now at every missing character we append '='. So for one missing character, '=' is used; for every two missing characters '==' is used.

For example Lets see how the word 'Cloud' would be encoded into base64 :


Therefore, the Base64 equivalent for Cloud becomes Q2xvdWQ=. Similarly if there, two words is missing in the pair then we have to put two == characters in the bas64 encoded string.

Base64 Encoding/Decoding Functions :

In Javascript :

For Base64 encoding :  btoa()
 var str = 'sec-art.net';
 var encoded_string = btoa(str);
 console.log(encoded_string); 	// output is 'c2VjLWFydC5uZXQ='
For Base64 decoding : atob()
 var encoded_string = "c2VjLWFydC5uZXQ=";
 var decoded_string = atob(encoded_string);
 console.log(decoded_string);
In PHP :

For Base64 encoding : base64_encode()
 <?php
 $str = 'sec-art.net';
 echo base64_encode($str);
 ?>		
For Base64 decoding : base64_decode()
 >?php
 $str = 'c2VjLWFydC5uZXQ=';
 echo base64_decode($str);
 ?<


Conclusion :

Base-64 encoding is a way of taking binary data and turning it into text so that it's more easily transmitted in things like e-mail and HTML form data. It's a textual encoding of binary data where the resultant text has nothing but letters, numbers and the symbols "+", "/" and "=". It's a convenient way to store/transmit binary data over media that is specifically used for textual data.
Read more »

Web Scrapping with Python using BeautifulSoup module

Web Scrapping (also known as web harvesting or web data extraction ) is a technique used to extract information and data from websites. In this tutorial we are going to use a python module called beautifulSoup for web scrapping. It is very powerful python library for extract data from HTML and XML files. But note that BeautifulSoup does not send any page requests to website, so we have to do this by using other modules like urllib2, requests etc. Now first we need to install BeautifulSoup Library. To install the BeautifulSoup module use the below command :
 sudo apt-get install python-bs4
or you can also install with pip
 pip install beautifulsoup4
or in-order to install BeautifulSoup from source, Download the source from here

https://www.crummy.com/software/BeautifulSoup/bs4/download/4.6/

Then extract it and run the setup.py file
 tar xvf beautifulsoup4-x.x.tar.gz
 python setup.py install

Installing HTML Parser :

In Beautiful Soup we need to suppy an html parser to process the data. With python an html parser ('html.parser') comes built in, But we can also instal some more powerfull html parsers like xml, html5lib etc. To install below parsers use the below command :
 sudo apt-get install python-lxml
 sudo apt-get install python-html5lib
or
 pip install lxml
 pip install html5lib
The lxml parser is very fast and can be used to quickly parse given HTML. But the html5lib is a bit slow as compared to lxml, but it is also very useful parser. To clearify the difference between all the parsers, try the below code :
 $ python
 
 >>> from bs4 import BeautifulSoup
 >>> code = """<html>
 <HEAD>
 <title>This is test
 </HEAD>
 <body>
 <p>Hello world This is test</p>
 </html>"""
html.pareser :
 >>> psr1 = BeautifulSoup(code, 'html.parser')
 >>> print psr1
 <html>
 <head>
 <title>This is test
 </title></head>
 <body>
 <p>Hello world This is test</p>
 </body></html>
xml parser :
 >>> psr2 = BeautifulSoup(code, 'xml')
 >>> print psr2
 <?xml version="1.0" encoding="utf-8"?>
 <html>
 <HEAD>
 <title>This is test
 </title>
 <body>
 <p>Hello world This is test</p>
 </body></HEAD></html>
lxml parser :
 >>> psr3 = BeautifulSoup(code, 'lxml')
 >>> print psr3
 <html>
 <head>
 <title>This is test
 </title></head>
 <body>
 <p>Hello world This is test</p>
 </body></html>
html5lib parser :


Basics of beautifulSoup :

Now here are some basic example of how to use BeautifulSoup Library for Web Scrapping, we are taking a simple html code for demonstration :
 <html>
 <head>
  <title>Simple Web Page</title>
 </head>
 <body>
  <p class='heading'>Hello world : A Sample Page test</p>
  <p class='sub-heading'>This the Sub-heading or Description</p>
  <table>
    <tr>
   <th>Firstname</th><th>Lastname</th> <th>Age</th>
  </tr>
  <tr>
   <td>Frank</td><td>Castle</td><td>40</td>
    </tr>
    <tr>
   <td>Jack</td><td>Rietcher</td><td>45</td>
    </tr>
  </table>
  <a href="http://wikipedia.org/">Wikipedia</a>
  <a href="http://youtube.com">Watch Videos</a>
  <a href="http://google.com">Search Something</a>
  <a href="http://facebook.com">Find Your Friends</a>
 <body>
</html>
Store the above code in a variable in python interpreter
 code = """<html>
 <head>
  <title>Simple Web Page</title>
 </head>
 <body>
  <p class='heading'>Hello world : A Sample Page test</p>
  <p class='sub-heading'>This the Sub-heading or Description</p>
  <table>
    <tr>
    <th>Firstname</th><th>Lastname</th> <th>Age</th>
  </tr>
  <tr>
   <td>Frank</td><td>Castle</td><td>40</td>
    </tr>
    <tr>
   <td>Jack</td><td>Rietcher</td><td>45</td>
    </tr>
  </table>
  <a href="http://wikipedia.org/">Wikipedia</a>
  <a href="http://youtube.com">Watch Videos</a>
  <a href="http://google.com">Search Something</a>
  <a href="http://facebook.com">Find Your Friends</a>
 <body>
</html>"""
Now import the BeautifulSoup library :
 from bs4 import BeautifulSoup
Now create a bs4 object to parse the data, we going to use lxml parser in this example :
 soup = BeautifulSoup(code, 'lxml')
Now with the soup objects we can access all elements of the html page throgh tag names and its attributes. For example to get the title of page
 >>> soup.title
 <title>Simple Web Page</title>

 >>> soup.title.string
 u'Simple Web Page'

 >>> soup.title.name
 'title'
To get the paragraph :
  >>> soup.p
 <p class="heading">Hello world : A Sample Page test</p>
 
 >>> print soup.p.contents
 [u'Hello world : A Sample Page test']

 >>> soup.p.string
 u'Hello world : A Sample Page test'
To get all paragraph
  >>> soup.find_all('p')
 [<p class="heading">Hello world : A Sample Page test</p>, <p class="sub-heading">This the Sub-heading or Description</p>]
Extracting table information
   >>> soup.body.table
 <table>\n<tr>\n<th>Firstname</th><th>Lastname</th> <th>Age</th>\n</tr>\n<tr>\n<td>Frank</td><td>Castle</td><td>40</td>
 \n</tr>\n<tr>\n<td>Jack</td><td>Rietcher</td><td>45</td>\n</tr>\n</table>
 
 >>> soup.body.table.tr
 <tr>\n<th>Firstname</th><th>Lastname</th> <th>Age</th>\n</tr>
 
 >>> soup.body.table.tr.th
 <th>Firstname</th>
 
 >>> soup.body.table.tr.find_all('th')
 [<th>Firstname</th>, <th>Lastname</th>, <th>Age</th>]
printing all rows data in table
 >>> for dat in soup.body.table.find_all('tr'):
 ...      for ind in dat.find_all('td'):
 ...             print ind.string
 ... 
 Frank
 Castle
 40
 Jack
 Rietcher
 45
Getting link information
  >>> soup.body.a
 <a href="http://wikipedia.org/">Wikipedia</a>
 
 >>> soup.body.find_all('a')
 [<a href="http://wikipedia.org/">Wikipedia</a>, <a href="http://youtube.com">Watch Videos</a>, <a href="http://google.com">Search Something</a>, 
 <a href="http://facebook.com">Find Your Friends</a>]
print all the links :
 >>> for link in soup.body.find_all('a'):
 ...     print link['href']
 ... 
 http://wikipedia.org/
 http://youtube.com
 http://google.com
 http://facebook.com
With next_sibling and previous_sibling we can navigate between page elements that are on the same level
 >>> soup.body.p
 <p class="heading">Hello world : A Sample Page test</p>

 >>> soup.body.p.next_sibling
 u'\n'

 >>> soup.body.p.next_sibling.next_sibling
 <p class="sub-heading">This the Sub-heading or Description</p>

Parsing a Webpage with urllib2 and BeautifulSoup :

first imoprt all the necessary libraries
 from bs4 import BeautifulSoup
 import urllib2
Now to get the page, send the get request to the page url https://www.w3.org, and parse it with BeautifulSoup
 page = urllib2.urlopen("https://www.w3.org")
 soup = BeautifulSoup(page, 'lxml')
Now get the title of the page
 >>> soup.title.string
 u'World Wide Web Consortium (W3C)'

 >>> soup.body.p
 <p class="bct"><span class="skip"><a accesskey="2" href="#w3c_most-recently" tabindex="1" title="Skip to content (e.g., when browsing via audio)">Skip</a></span></p>

Harvesting all the links
 >>> for link in soup.find_all('a'):
 ...     print link['href']
 ... 
 /
 /standards/
 /participate/
 ------------
 -----------
 https://www.w3.org/WAI/videos/standards-and-benefits.html
 https://www.w3.org/WAI/videos/standards-and-benefits.html
 http://lists.w3.org/Archives/Public/site-comments/
 http://twitter.com/W3C
 http://www.csail.mit.edu/
 http://www.ercim.eu/
 http://www.keio.ac.jp/
 http://ev.buaa.edu.cn/
Printing all the text from page :
 print (soup.get_text())
And with like the above we can collect information by parsing the web pages.

Conclusion :

The BeautifulSoup is very powerful library to parse the HTML and XML documents and collecting data from it. At above we saw some very basic example of how to use it. And For more detail information please check the documentation page at here : Official Documentation
Read more »

A Beginners Guide to requests Library in Python : How to Use requests library in Python

Most existing Python modules for sending HTTP requests are extremely verbose and cumbersome. Python’s builtin urllib2 module provides most of the HTTP capabilities you should need, but the api is thoroughly broken. It requires an enormous amount of work (even method overrides) to perform the simplest of tasks.
Read more »

How to use urllib2 module in Python : A Beginners guide to urllib2 module

urllib2 is a Python module for fetching URLs. It offers a very simple interface, in the form of the urlopen function.  The urllib2 is capable of fetching URLs using a variety of different protocols and it also supports slightly complex interface for handling common situations - like basic authentication, cookies, proxies and so on. 
Read more »

Banner Grabbing with Python

In the previous post we saw the basics of banner grabbing techniques. Now we are trying to grab banners with some python scripts. In python we are going to use socket module to connect to target services. The socket module exposes the low-level C API for communicating over a network using the BSD socket interface.
Read more »

A Beginners Guide to vi / vim text editor

vi (visual editor) is a terminal based text editing application, originally created for the Unix operating system. It is a fast, powerful and most popular and classic text editor in the Linux family. It is available in almost all Linux and Unix Distributions, and works the same across different platforms and Distributions. Vi does not contain any menu, instead it uses combinations of keystrokes to accomplish an action. It requires very few resources to run. An improved version of the vi editor which is called the VIM (Vi IMproved) has also been made available now. The vi editor is a full screen editor and has two modes of operation:
Read more »

Hexadecimal to Char Converter in Python


The below python script simply convert Hexadecimal inputs into ASCII Characters

 #!/usr/bin/python  
 import sys  
 if(len(sys.argv) != 2):  
   print "\n\tUsage: %s <hex_values>\n" % sys.argv[0]  
   print "\t  Ex: %s 41424344\n" % sys.argv[0]  
   sys.exit(1)  
 tl = len(sys.argv[1])  
 x = 0  
 str = ""  
 while((x+2) <= tl):  
   ch = chr(int(sys.argv[1][x:x+2], 16))  
   print "[0x" + sys.argv[1][x:x+2] + "] = " + ch  
   str += ch  
   x += 2  
 print  
 print "String= " + str + "\n"  


Read more »

Enable Core Dump in current working directory for C/C++ programs on Ubuntu 16.x

Check the '/proc/sys/kernel/core_pattern' file

    cat /proc/sys/kernel/core_pattern

if the output of above command is

    |/usr/share/apport/apport %p %s %c %P

then you need to edit the 'core_pattern' file and replace

    |/usr/share/apport/apport %p %s %c %P

with

    core.%e.%p

to do this by below command

sudo su -c 'echo "core.%e.%p" > /proc/sys/kernel/core_pattern'

it will ask you for root password, and its done. At the string 'core.%e.%p' %e means the executable file name and %p denotes the processID. Now to test the core dumping first run below command

ulimit -c unlimited

then compile below code and run it.
test.c
 #include<stdio.h>  
 int main()  
 {  
      char buff[20];  
      int i;  
      for(i=0;i<40;i++) {  
           buff[i] ='\x41';  
      }  
 }  


Read more »

Shell script to Ping your Home Lan Network

i wrote a simple shell script which ping the provided range of ip in a Lan network and shows the host is up or down.

ping.sh
 #!/bin/bash  
 # ./ping.sh <starting_address> <end_address>  
 # ./ping.sh 100 120  
 #  
 for((x=$1;x<=$2;x++))  
 do   
     ping -W1 -c1 192.168.0.$x > /dev/null  
      if [ $? -eq 0 ]  
     then  
         echo "host 192.168.0.$x : Up"  
     else  
         echo "host 192.168.0.$x : Down"  
     fi  
 done  

Now lets run it

./ping.sh 100 120


Thanks..

Read more »

Simple Python Web Server with CGI

Here is the code for python CGI Web server :

CgiServer.py

 #!/usr/bin/env python  
   
 import BaseHTTPServer  
 import CGIHTTPServer  
 import cgitb; cgitb.enable() # This line enables CGI error reporting  
   
 ServerHandler = CGIHTTPServer.CGIHTTPRequestHandler  
 ServerHandler.cgi_directories = ["/"]  
 HttpServer = BaseHTTPServer.HTTPServer(("", 8000), ServerHandler)  
 HttpServer.serve_forever()  

and here's the code for a sample page:

TasgePage.py

 #!/usr/bin/env python  
   
 print """Content-type:text/html\r\n\r\n  
 <html>  
 <head>  
  <title>Test Page</title>  
 </head>  
 <body>  
  <center><h1>Hello world. This is The Test Page</h1></center>  
 </body>  
 </html>"""  

then set the executable permissions for both file and run the CgiServer.py

 $ chmod +x CgiServer.py  
 $ chmod +x TestPage.py  
 $ ./CgiServer.py  

now oen your web browser and type the following url

http://localhost:8000/TestPage.py


voila!!, thats it. For more information visit : https://wiki.python.org/moin/CgiScripts
Read more »

Simple Echo Server in python using Sockets

A simple echo server which just echo the client supplied data or string

code :  Server.py

 #!/usr/bin/python  
   
 import socket  
   
 tcpSocket = socket.socket(socket.AF_INET, socket.SOCK_STREAM)  
 tcpSocket.setsockopt(socket.SOL_SOCKET, socket.SO_REUSEADDR, 1)  
   
 tcpSocket.bind(("0.0.0.0", 8000))  
 tcpSocket.listen(2)  
   
   
 while 1:  
  print "Waiting for a Client ... "  
  (client, (ip, sock)) = tcpSocket.accept()  
   
  print "Received connection from : ", ip  
  client.send("Press Return or Ctrl+C to close..\n")  
  print "Starting ECHO output ... "  
   
  data = 'dummy'  
   
  while len(data):  
  data = client.recv(2048)  
  if len(data)==1:  
   print "Closing connection with ", ip  
   client.close()  
   print "Connection closed successfully.!!"  
   print "---------------------------------"  
   break  
  if len(data)==0:  
   print "Some Error in connection with ", ip  
   print "Connection closed with ", ip  
   print "---------------------------------"  
   break  
  print "Client sent:", data  
  client.send(data)  
   
 tcpSocket.close()  
   

But the above server code process only a single client at a time.


Now with the use of threading we can solve this problem. Here is the second echo server which handle multiple connection with threads

Threaded_server.py

 #!/usr/bin/python  
   
 import thread  
 import socket  
   
 tcpSocket = socket.socket(socket.AF_INET, socket.SOCK_STREAM)  
 tcpSocket.setsockopt(socket.SOL_SOCKET, socket.SO_REUSEADDR, 1)  
   
 tcpSocket.bind(("0.0.0.0", 8000))  
 tcpSocket.listen(2)  
   
 def conn_handler(client, ip, thread_id):  
      print "[T%d]Received connection from : %r" % (thread_id, ip)  
      client.send("Press Return or Ctrl+C to close..\n")  
      print "[T%d]Starting echo output..." % thread_id  
      data = 'dummy'  
      while len(data):  
           data = client.recv(2048)  
           if len(data)==1:  
                print "[T%d]Closing connection with %r" % (thread_id, ip)  
                client.close()  
                print "[T%d]Connection closed successfully.!!" % thread_id  
                print "------------------------------------"  
                break  
           if len(data)==0:  
                print "[T%d]Some Error in connection with %r" % (thread_id, ip)  
                print "[T%d]Connection closed with %r" % (thread_id, ip)  
                print "------------------------------------"  
                break  
           print "[T%d]Client sent: %s" % (thread_id, data)  
           client.send(data)  
   
   
 thread_id = 0  
 while 1:  
      thread_id = thread_id + 1  
      print "Waiting for Client ...\n"  
      (client, (ip, sock)) = tcpSocket.accept()  
   
      try:  
           thread.start_new_thread(conn_handler, (client, ip, thread_id, ))  
      except:  
           print "Error: Unable to start thread [T%d]\n" % thread_id  
   
 tcpSocket.close()  


Multi-Process Echo Server

 #!/usr/bin/python  
   
 from multiprocessing import Process  
 import socket  
 import os  
 import signal  
   
 tcpSocket = socket.socket(socket.AF_INET, socket.SOCK_STREAM)  
 tcpSocket.setsockopt(socket.SOL_SOCKET, socket.SO_REUSEADDR, 1)  
   
 tcpSocket.bind(("0.0.0.0", 8000))  
 tcpSocket.listen(2)  
   
 def conn_handler(client, ip, Child_id):  
      print "[C%d]Received connection from : %r" % (Child_id, ip)  
      print "[C%d]Starting echo output... " % Child_id  
      data = 'dummy'  
      while len(data):  
           data = client.recv(2048)  
           if len(data)==0:  
                print "[C%d]Closing connection with %r" % (Child_id, ip)  
                client.close()  
                print "[C%d]Connection closed with %r" % (Child_id, ip)  
                os.kill(os.getpid(), signal.SIGTERM)  
           print "[C%d]Client sent: %s" % (Child_id, data)  
           client.send(data)  
   
 def main():  
      Child_id = 0  
      while 1:  
           Child_id = Child_id + 1  
           print "Waiting for Client ...\n"  
           (client, (ip, sock)) = tcpSocket.accept()  
   
           try:  
                Process(target=conn_handler, args=(client, ip, Child_id)).start()  
           except:  
                print "Error: Uable to start Child Process.!![C%d]" % Child_id  
        
      tcpSocket.close()  
   
   
 if __name__ == "__main__":  
      main()  

you can try out with nc, to close the connection just press 'Ctrl + C' or use the below client.py code to communicate with multiprocess_server.py

Client.py

 #!/usr/bin/python  
 import socket  
 import sys  
 tcpSocket = socket.socket(socket.AF_INET, socket.SOCK_STREAM)  
 tcpSocket.connect((sys.argv[1], int(sys.argv[2])))  
 print "Input some string : ['quit' to exit]"  
 data = "dummy"  
 while 1:  
      data = raw_input("|> ")  
      if data=="quit":  
           tcpSocket.close()  
           break  
      tcpSocket.sendall(data)  
      result = tcpSocket.recv(2048)  
      print result   
Read more »

Simple C Client/Server Codes For Socket Programing in Linux


Here is the codes for client/server program. And note these c sockets codes are in its simplest form without any error handling function or routine.

For TCP Sockets : 

Server.c
 #include<stdio.h>  
 #include<stdlib.h>  
 #include<string.h>  
 #include<unistd.h>  
 #include<arpa/inet.h>  
 #include<sys/types.h>  
 #include<netinet/in.h>  
 #include<sys/socket.h>  
   
 #define PORTNUM 9999  
   
 int main(int argc, char *argv[])  
 {  
     char *msg = "Hello world!\n";  
   
     struct sockaddr_in clnt; //socket info for client machine  
     struct sockaddr_in serv; //socket info for our server   
     int mysocket;  
   
     socklen_t socksize = sizeof(struct sockaddr_in);  
   
     memset(&serv, 0, sizeof(serv));  
   
     serv.sin_family = AF_INET;  
     serv.sin_addr.s_addr = htonl(INADDR_ANY);  
     serv.sin_port = htons(PORTNUM);  
       
     mysocket = socket(AF_INET, SOCK_STREAM, 0);  
   
     bind(mysocket, (struct sockaddr *)&serv, sizeof(struct sockaddr));  
     // bind serv info to mysocket   
   
     listen(mysocket, 1);  
     int consocket = accept(mysocket, (struct sockaddr *)&clnt, &socksize);  
   
     while(consocket)  
     {  
         printf("Incoming connection from %s - sending welcome\n", inet_ntoa(clnt.sin_addr));  
   
         send(consocket, msg, strlen(msg), 0);  
         close(consocket);  
         consocket = accept(mysocket, (struct sockaddr *)&clnt, &socksize);  
     }  
   
     close(mysocket);  
     return EXIT_SUCCESS;  
 }  

Client.c

 #include<stdio.h>  
 #include<stdlib.h>  
 #include<string.h>  
 #include<unistd.h>  
 #include<arpa/inet.h>  
 #include<sys/types.h>  
 #include<netinet/in.h>  
 #include<sys/socket.h>  
   
 #define MAXRECVLEN 500  
 #define PORTNUM 9999  
   
   
 int main(int aregc, char *argv[])  
 {  
     char buffer[MAXRECVLEN]; // +1 for null terminator  
     int len, mysocket;  
     struct sockaddr_in dest; // for access in sockaddr_in struct  
   
     mysocket = socket(AF_INET, SOCK_STREAM, 0);  
   
     memset(&dest, 0, sizeof(dest)); // zero the sockaddr_in struct  
   
     dest.sin_family = AF_INET;  
     dest.sin_addr.s_addr = htonl(INADDR_ANY);  
     dest.sin_port = htons(PORTNUM);  
   
     connect(mysocket, (struct sockaddr *)&dest, sizeof(struct sockaddr));  
   
     len = recv(mysocket, buffer, MAXRECVLEN - 1, 0);  
   
     buffer[len] = '\0';  
   
     printf("Received bytes : %s. \n", buffer);  
   
     close(mysocket);  
     return EXIT_SUCCESS;  
 }  

Now compile the both codes with gcc and run it. I run these programs in Ubuntu 11.10.

First compile it.

$ gcc -o server server.c  
$ gcc -o client client.c  

but remember always run server first and then client.


For UDP Sockets :

udp_server.c
 #include<stdio.h>  
 #include<stdlib.h>  
 #include<unistd.h>  
 #include<errno.h>  
 #include<string.h>  
 #include<sys/types.h>  
 #include<sys/socket.h>  
 #include<netinet/in.h>  
 #include<arpa/inet.h>  
 #include<netdb.h>  
   
 #define MYPORT 9999  
 #define MAXBUFLEN 100  
   
 int main(int argc, char *argv[])  
 {  
     struct sockaddr_in clnt;  
     struct sockaddr_in serv;  
     char BUFF[MAXBUFLEN];  
   
     int mysocket;  
     int numbytes;  
   
     memset(&serv, 0, sizeof(serv));  
   
     serv.sin_family    = AF_INET;  
     serv.sin_addr.s_addr = htonl(INADDR_ANY);  
     serv.sin_port = htons(MYPORT);  
   
     mysocket = socket(AF_INET, SOCK_DGRAM, 0);  
   
     bind(mysocket, (struct sockaddr *)&serv, sizeof(struct sockaddr));  
   
     int clnt_len = sizeof(clnt);  
   
     while(1){  
         if((numbytes = recvfrom(mysocket, BUFF, MAXBUFLEN-1, 0, (struct sockaddr *)&clnt, &clnt_len)) == -1) {  
             perror("died in recvfrom.\n");  
             exit(1);  
         }  
   
         BUFF[numbytes] = '\0';  
         printf("Recevied Packet from %s:%d\nData: %s\n\n", inet_ntoa(clnt.sin_addr), ntohs(clnt.sin_port), BUFF);  
     }  
 close(mysocket);  
 return 0;  
 }  
   

udp_client.c

 #include<stdio.h>  
 #include<stdlib.h>  
 #include<unistd.h>  
 #include<errno.h>  
 #include<string.h>  
 #include<sys/types.h>  
 #include<sys/socket.h>  
 #include<netinet/in.h>  
 #include<arpa/inet.h>  
 #include<netdb.h>  
   
 int main(int argc, char *argv[])  
 {  
     if(argc != 4){  
         printf("Usage : %s <IP> <PORT> <message>\n", argv[0]);  
         return 1;  
     }  
   
     int mysocket, PORT;  
     struct sockaddr_in dest;  
     socklen_t dest_len = sizeof(dest);  
       
     PORT = atoi(argv[2]);  
   
     memset(&dest, 0, sizeof(dest));  
   
     dest.sin_family = AF_INET;  
     dest.sin_addr.s_addr = inet_addr(argv[1]);  
     dest.sin_port = htons(PORT);  
   
     mysocket = socket(AF_INET, SOCK_DGRAM, 0);  
   
     sendto(mysocket, argv[3], strlen(argv[3]), 0, (struct sockaddr *)&dest, dest_len);  
       
     printf("Sent bytes : %s\n", argv[3]);  
     close(mysocket);  
     return 0;  
 }  
   

Compile it and run it.


So this is it. thanks for visiting. and for detailed explanations in Linux/Unix Socket Programing checkout the below given link.

Beej's Guide To Network Programing : http://beej.us/guide/bgnet/

Read more »

Compress Folders via Command line using VBscript


Hi guys, Here is a small VBscript for compress or Zip/Unzip folders via command line in windows.

Code :

1:  ' Script name : zuip.vbs  
2: 
3:  ' A simple vbscript for zipping a folder or unzip a Zip File.  
4:  '  
5:  ' By : http://www.Sec-Articles.blogspot.com   03/2015  
6:  '  
7:  ' credits : peter mortensen for zipping function.(http://www.superuser.com/users/517/peter-mortensen)  
8:  '  
9:  ' Usage :-  
10: '  
11: ' For Zipping  : cscript zuip.vbs C [path_to_folder] [path_to_zip_file]  
12: '  
13: ' For Unzipping : cscript zuip.vbs E [path_to_Zip_Archive] [path_to _Extract]  
14: '  
15:    
16:  Option Explicit  
17:    
18:  Dim ObjArgs  
19:  Set ObjArgs = Wscript.Arguments  
20:    
21:  IF (ObjArgs.Count <> 3) Then  
22:          Wscript.echo "??.. Something Error in Arguments..!!"  
23:          Wscript.echo "Options : "  
24:          Wscript.echo "For Zipping -"  
25:          Wscript.echo "cscript zuip.vbs C [path_to_folder] [path_to_zip_file] "  
26:          Wscript.echo "For Unzipping -"  
27:          Wscript.echo "cscript zuip.vbs E [path_to_Zip_Archive] [path_to _Extract]"  
28:          Wscript.quit  
29:  End IF  
30:    
31:  Select Case ObjArgs(0)  
32:      Case "C"  
33:          Zipper ObjArgs(1), ObjArgs(2)  
34:      Case "c"  
35:          Zipper ObjArgs(1), ObjArgs(2)  
36:      Case "E"  
37:          Unzipper ObjArgs(1), ObjArgs(2)  
38:      Case "e"  
39:          Unzipper ObjArgs(1), ObjArgs(2)  
40:      Case Else  
41:          Wscript.echo "No Match Found..!!!"  
42:          Wscript.echo "Options : "  
43:          Wscript.echo "For Zipping -"  
44:          Wscript.echo "cscript zuip.vbs C [path_to_folder] [path_to_zip_file] "  
45:          Wscript.echo "For Unzipping -"  
46:          Wscript.echo "cscript zuip.vbs E [path_to_Zip_Archive] [path_to _Extract]"  
47:  End Select  
48:    
49:    
50:  '  
51:  ' Zipping Function  
52:  '  
53:  Function Zipper(SrcF, DestF)  
54:    
55:      Dim fsys  
56:      set fsys = Wscript.CreateObject("Scripting.FileSystemObject")  
57:        
58:      IF Not (fsys.FolderExists(SrcF)) then  
59:          Wscript.echo " Source Folder Could not found..!! Please Check the path Again."  
60:          Exit Function  
61:      End IF   
62:        
63:      IF (fsys.FileExists(DestF)) then  
64:          Wscript.echo " Zip file Already Exists..!! Deleting it..?"  
65:          fsys.DeleteFile DestF  
66:          Wscript.echo " Zip file Deleted SuccessFully."  
67:      End IF   
68:    
69:      ' create an empty zip file  
70:      CreateObject("Scripting.FileSystemObject").CreateTextFile(DestF, True).Write "PK" & chr(5) & chr(6) & String(18, 0)  
71:        
72:      dim objshell, src, des  
73:        
74:      Set objshell = CreateObject("Shell.Application")  
75:      Set src = objshell.NameSpace(SrcF)  
76:      Set des = objshell.NameSpace(DestF)  
77:        
78:      des.CopyHere(src.Items)  
79:        
80:      Do Until des.Items.Count = src.Items.Count  
81:          Wscript.Sleep(200)  
82:      Loop  
83:    
84:      Wscript.echo "SuccessFully Zipped...!!!"      
85:            
86:      Set fsys = Nothing  
87:      Set objshell = Nothing  
88:      Set src = Nothing  
89:      Set des = Nothing  
90:    
91:  End Function   
92:    
93:    
94:  '  
95:  ' Unzipping Function   
96:  '  
97:  Function Unzipper(zipF, extrF)  
98:    
99:      Dim fsys  
100:      set fsys = Wscript.CreateObject("Scripting.FileSystemObject")  
101:        
102:      IF Not (fsys.FileExists(zipF)) Then  
103:          Wscript.echo "Could not Found Zip Archive..!! please Check the Path Again."  
104:          Exit Function  
105:      End IF  
106:        
107:      IF Not (fsys.FolderExists(extrF)) Then  
108:          Wscript.echo "Could not Found Folder To Extract..!! Creating Folder..."  
109:          fsys.CreateFolder(extrF)  
110:          Wscript.echo "Folder Created SuccessFully."  
111:      End IF  
112:        
113:      Dim objshell, zip, extr  
114:        
115:      Set objshell = CreateObject("Shell.Application")  
116:      Set zip = objshell.NameSpace(zipF)  
117:      Set extr = objshell.NameSpace(extrF)  
118:        
119:      extr.CopyHere(zip.Items)  
120:        
121:      Do Until extr.Items.Count = zip.Items.Count  
122:          Wscript.Sleep(200)  
123:      Loop  
124:        
125:      Wscript.echo "SuccessFully Extracted.!!"  
126:        
127:      Set fsys = Nothing  
128:      Set objshell = Nothing  
129:      Set zip = Nothing  
130:      Set extr = Nothing  
131:        
132:  End Function  

Download it From here :

How To Use :


For Compress a Folder

 Syntax  : cscript zuip.vbs C [path_to_folder] [path_to_zip_file]  
 Example : cscript zuip.vbs C "C:\Users\Ajay\desktop\test" "C:\Users\Ajay\desktop\test.zip"  

and for extracting files from a Zip archive

 Syntax  :  cscript zuip.vbs E [path_to_Zip_Archive] [path_to _Extract]  
 Example :  cscript zuip.vbs E "C:\Users\Ajay\desktop\test.zip" "C:\Users\Ajay\desktop\test"  

How To Use Video :


Ok..!! Thats all for this.
I hope you like this.
& Thanks for visiting.


Read more »

How to Install & Run Turbo C++ in Windows 7/8 (32/64 bit) with Full-Screen


Turbo C++ is a16 bit MS-DOS based application which works perfectly on windows xp and older versions, but newer version of windows Operating Systems does not totally support 16 bit applications. The 32 bit version of windows 7/8 only runs Turbo C++ IDE and when you try to compile your code then it fails, because it could not support 16 bit compiler and 64 bit OS only support 32 bit and 64 bit applications. So in order to run Turbo C++ in windows 7/8 we use an application DosBox, which basically emulates a 16bit MS-DOS like Operating System environment. I have created a single installer which automatically installs DosBox, Turbo C++ and configure it. Here is download Links :

32bit version   download link
64bit version   download link

How To Install Video


Or if you want to install and configure it yourself then here is the method :
First of all download TurboC++ and DosBox setup from here :

TurboC++    Click here to download
DosBox        Click here to download

Create a folder in C drive to store all 16 bit applications. in my case i create a folder named "16bit".
Extract TurboC++ files on recently created folder, after that install & run DosBox then type following commands on it.

mount C C:\16bit\


above command will mount the folder "16bit" as C drive for emulated DOS-OS

C:


this command will change drive into C.

cd tc\bin


this command will change directory and locate tc.exe file

tc.exe


now this command launches TurboC++. For full-screen just press ALT + ENTER

Now you need to Re-map two keys F9 and Left Control, because if you press both keys to compile and run your code then DosBox will be closed down. So to Re-map keys start DosBox and press Left-Control + F1, then select F9 button by clicking on it and then click on 'del' button.


Then repeat same process for Left-Control button.


Now again click F9 button, then click 'add' button, after that press F9 button on your keyboard, this will assign new event for F9 button.


Again repeat same process for Left-Control button.


then click on save button and exit.


the above processes will re-map both keys.

You can also automate the mounting process by editing DosBox configuration file. To do this just go-to start menu and type "DosBox Options" in Search Box.


Now click on "DOSBox 0.74 Options", this will open up DosBox configuration file, after that scroll down bottom of file and add these code :

mount C C:\16bit\
C:
cd tc\bin
tc.exe


note : adjust your file path for tc directory in first command, in my case it is "C:\16bit\", then save it. Now when you run DosBox then TurboC++ will automatically start. that is the manual process. If you have faced any problem of those instructions then just download and install the above given automated installers.

Thanks for reading this Post.
& if you like it, then please comment and share it. Thank you ...!!
Read more »

A simple Zip Password Cracker Shell script for Linux Systems

Hello Guys, in this post we look at a simple Zip Password cracker shell script which Brute-Force a password protected zip file in order to get the password.


Code

Simple Zip Password Cracker

 #!/usr/bin/bash env
 #  
 # +=======================================================+  
 # || A Simple ZIP Password Cracker                       ||  
 # || Developed By : http:\\www.sec-articles.blogspot.com ||  
 # +=======================================================+  
 #  
 declare -r TRUE=0  
 declare -r FALSE=1  
 flag=$FALSE  
 counter=0  
 # Declaring char_sets  
 chars_1=`echo {a..z}`  
 chars_2=`echo {A..Z}`  
 chars_3=`echo {0..9}`  
 chars_4="~ ! @ \$ % ^ - _ = + { } [ ] : , . / ?"  
 # cracking function  
 function cracker()   
 {  
     pass=$1  
     echo "trying Password $pass"  
     counter=$(($counter + 1))  
     unzip -P $pass -o $file_name  
     [ $? -eq 0 ] && clear && Banner && echo "Password Found : $pass" && echo "Password tried : $counter"&& return $TRUE || return $FALSE   
 }  
 # word_List generator  
 function word_gen()   
 {  
     args=$1  
     [ ${#args} -ge $length ] && cracker $1 && echo "Password Cracked" && flag=$TRUE && exit   
     if [ ${#args} -lt $length ]; then  
         for c in $chars; do  
             word_gen $1$c  
         done  
     fi  
 }  
 function is_num()  
 {  
     [ "$1" -eq "$1" ] > /dev/null 2>&1  
     return $?  
 }  
 function Show_message()   
 {  
     echo "+===============================================+"  
     echo "| A Simple ZIP Password Cracker        |"  
     echo "| Developed By : http:\\\\www.sec-articles.net  |"  
     echo "+===============================================+"  
     echo " ./s_zipcrack [Mode b/d] {[Lenght_of_Passowrd] [Type_Password] [location]} {[location]}"  
     echo""  
     echo " For brute_force Mode :- "  
     echo " ./s_zipcrack -b [Lenght_of_Passowrd] [Type_Password] [zip_file_location]"      
     echo " Length_of_Password - integer value"  
     echo " Type_of_Password  - \"A\" Upper_case   A-Z"  
     echo "          - \"a\" Lower_case   a-z"  
     echo "          - \"n\" numeric    0-9"  
     echo "          - \"c\" Special_chars !.?"  
     echo " zip_file_Location - Full Path of Zip File"      
     echo " Example : ./s_zipcrack -b 4 n /home/user/Desktop/secure.zip"  
     echo ""  
     echo " For Dictonary Mode : - "  
     echo " ./s_zipcrack -d [Password_dictonary_file] [zip_file_Location]"  
     echo " Password_dictonary_file - Full Path of Password dictonary file "  
     echo " zip_file_Location    - Full Path of Zip file"  
 }  
 function Banner()  
 {  
     echo "+===============================================+"  
     echo "| A Simple ZIP Password Cracker        |"  
     echo "| Developed By : http:\\\\www.sec-articles.net  |"  
     echo "+===============================================+"  
     echo ""  
 }  
 function brute_force()  
 {  
     # Handling Arguments  
     if [ "$1" = "" ]   
     then  
         Show_message  
         exit  
     fi  
     if is_num $1  
     then  
         length=$1  
     else  
         length=2  
     fi  
     for args in "$@"; do  
         case $args in  
             a) chars="$chars $chars_1" ;;  
             A) chars="$chars $chars_2" ;;  
             n) chars="$chars $chars_3" ;;  
             c) chars="$chars $chars_4" ;;  
         esac;  
     done  
     if [ "$chars" = "" ]  
     then  
         chars="$chars_1"  
     fi  
     for arg in "$@"; do  
         if [ -a $arg ]  
         then  
             file_name=$arg  
             break  
         fi  
     done  
     if [ "$file_name" = "" ]  
     then  
         Banner  
         echo "Could not find \"$3\""  
         echo "please check the file location & try Again."  
         exit  
     fi  
     #calling word_gen function   
     for w in $chars; do  
         word_gen $w  
     done  
 }  
 function dictonary()  
 {  
     if [ "$1" = "" ]  
     then  
         Banner  
         echo "please give the password_list."  
         exit 1  
     elif [ "$2" = "" ]  
     then   
         Banner  
         echo "please give the zip file location."  
         exit 1  
     fi  
     if [ -a $1 ]  
     then  
         pass_list=$1  
     else  
         Banner  
         echo "could not find \"$1\""  
         echo "please check the file location & try Again."  
         exit 1  
     fi  
     if [ -a $2 ]  
     then  
         file_name=$2  
     else  
         Banner  
         echo "could not find \"$2\""  
         echo "please check the file location & try Again."  
         exit 1  
     fi  
     # reading passwords & calling to cracker function  
     length=`cat $pass_list | wc -l`  
     for ((i=0;i<=$length;i++))  
     do  
         passwd=`sed -n "$i"p $pass_list`  
         cracker $passwd && echo "Password Cracked" && flag=$TRUE && exit   
     done  
 }  
 # Main  
 if [ "$1" = "b" ]  
 then  
     brute_force $2 $3 $4  
 elif [ "$1" = "d" ]  
 then  
     dictonary $2 $3  
 elif [ "$1" = "" ]  
 then  
     Show_message  
     exit  
 else  
     Banner  
     echo "Error in Arguments..!?"  
     echo "please choose the correct mode. b/d [brute_force/dictonary_attack]"  
     exit  
 fi  
 if [ $flag -eq $FALSE ]  
 then  
     clear  
     Banner   
     echo "Could not Found Password ?? "  
     echo "Password tried : $counter"  
     echo "please Try Again with other Keywords."  
 fi  

Download Code from Here :

How To Use It 

First download the script from above given link then open a terminal and change its permission into executable, i run this script in Ubuntu.

        chmod +x zp_crack.sh

then run the script


The first argument is mode which decides BruteForce method & there is two modes

1. b  : 


BruteForce with any combination of characters for example aaaa, aaab, aaac..... zzzz, 1111, 1112, 1113, ...... 9999 etc. With this mode program will takes three additional arguments

Length of password : It specify the length of word & takes an integer value as input.

Type of password : It specify which type of character set you want to use for example use "a" for lowercase alphabet characters, "A" for uppercase alphabet characters, "n" for numeric characters, "s" for special characters.

Zip file location : Give the full path of zip file.

Now to test this program we need to create a password protected zip file. first create a text file 
type this command oin your terminal

        echo This is secret Document > secret.txt

Then zip it using zip utility

        zip -P abcd secure.zip secret.txt


above command will create a zip file "secure.zip" with password "abcd". Now the password abcd consists four lowercase characters, so now we try to crack this password with our tool
Syntax is :

        ./zp_crack.sh b 4 a /home/ajay/Desktop/secure.zip


then hit enter


Bingo!!... password cracked.

2. d : 

Bruteforce with a list of words and try every word in that list to crack password. Its also known as "Dictionary Attack", with this mode program takes two additional arguments 

Password Dictionary Files : give the full path of password list or dictionary file.

Zip File Location : give the full path of zip file.

To demonstrate this i use a small list of words 


now the syntax will be :

        ./zp_crack.sh d /home/ajay/Desktop/pass_list.txt /home/ajay/Desktop/secure.zip


Again password is cracked.


Remember this is very basic BruteForce tool and it may not work on complex and lengthy passwords.
So, that's it. thanks for reading this post & if you like it then please comment and share this post.

Now here is the Demonstration Video :


Thank_you..!!  <(*_*)>
Read more »