Showing posts with label How-To. Show all posts

Install GO in UNIX/LINUX Environment

Go is a statically typed, compiled programming language designed at Google by Robert Griesemer, Rob Pike, and Ken Thompson. Follow the below steps to install it on you Linux/Unix Box :

  1. Download it from https://golang.org/dl/
$ curl -sSL https://golang.org/dl/goX.XX.X.linux-amd64.tar.gz -o goX.XX.X.linux-amd64.tar.gz

replace the X.XX.X with current version.

  1. Extract the downloaded file to /usr/local
$ sudo tar -C /usr/local -xzf goX.XX.X.linux-amd64.tar.gz
  1. Add the path /usr/local/go/bin to the environment variable, and for that just add the below lines to your .bashrc file, which is located on your home directory ~/.bashrc. Add below lines
export GOROOT=/usr/local/go
export GOPATH=$HOME/go
export PATH=$GOPATH/bin:$GOROOT/bin:$PATH

and now you are good to GO {he he !!}. Test the setup with go version

$ go version  
go version go1.15.3 linux/amd64

thats it.


Read more »

Install shutter screenshot tool with Editor Enabled in Ubuntu 18.04

Shutter is a screenshot application written in perl. You can take a screenshot of a specific area, window, your whole screen, or even of a website. You can apply different effects to it, draw on it to highlight points, and then upload to an image hosting site, all within one window.
Read more »

Installing Python Interpreter in Windows 10

Python is a popular high-level programming language used for general purpose programming. But unlike Linux/Unix based operating systems, python interpreter does not come pre-packaged with windows 10. It means we have to install it by ourselves.

Installing python in Windows 10 in very easy, we just need to download the installer file and install it. You can download python interpreter for windows from below link :
Read more »

How to Install bWAPP (buggy Web App) Web Application on Windows with XAMPP

bWAPP, or a buggy web application, is a free and open source PHP based web application for Practicing Web Pentesting and learn about web vulnerabilities in a safe environment. Its main goal is to provide a safe and legal environment for security professionals and students to test their skills and tools and learn about Web security.
Read more »

How to Install DVWA(Damn Vulnerable Web App) Web Application on Windows with XAMPP

DVWA or Damn Vulnerable Web App is a PHP based web application for Practicing Web Pentesting and learn about web vulnerabilities in a safe environment. Its main goal is to provide a safe and legal environment for security professionals and students to test their skills and tools and learn about Web security.
Read more »

How to Copy/Sync Files and Directories with Rsync in Linux : A Beginners Guide to Rsync

Rsync is a very flexible network-enabled syncing tool. It is a powerful tool that facilitates the transfer and synchronization of data between both local and remote systems. Rsync stands for "remote sync". It uses an algorithm that minimizes the amount of data copied by only moving the portions of files that have changed.
Read more »

Rar for Beginners : How to use Rar utility to Compress Files in Linux/Unix Based Systems

Rar is a command line tool to compress files and directories. It is the Linux port of the command line version of WinRAR. RAR is a proprietary archive file format that supports data compression, error recovery and file spanning. It was developed by a Russian software engineer, Eugene Roshal  and the RAR software is licensed by win.rar GmbH. The name RAR stands for Roshal Archive. The filename extensions used by RAR is .rar.
Read more »

Tar Archiver for Beginners : How to use tar to Archive Files/Directories in Linux/Unix Based Systems

Tar is a command line tool for Archiving files and directories. It is a widely used command line tool to create backup archives (collection of files and directories). Tar stands for Tape Archive, and sometimes referred to as tarball. The tar archive have as extension of '.Tar'.
Read more »

xz for Beginners : How to use xz to Compress Files in Linux/Unix Based Systems

xz is a general purpose data compression tool which uses LZMA/LZMA2 compression algorithms to compress files. This algorithm has a greater compression ratio than gzip and bzip2, which makes it a great format when we need to store data on limited disk space. But it takes significantly longer to do the compression. For instance, with the heavy compression flags on a fairly large file, gzip may require around half a minute, bzip2 might be somewhere around a minute, and xz may take around four or five minutes, but the decompression time is relatively good. It creates smaller files. This compression tool was first released in 2009, and the compressed file xz has extension of '.xz'.
Read more »

Bzip2 for Beginners : How to use Bzip2 to Compress Files in Linux/Unix Based Systems

Bzip2 is a free and open-source file compression program that uses the Burrows–Wheeler algorithm to compress files. The data format BZIP2 was created for the compression of single or concatenated files. Structure and usage of BZIP2 are similar to the older GZIP format. BZIP2 was developed as alternative to GZIP and offers improved compression.
Read more »

Gzip for Beginners : How to use Gzip to Compress Files in Linux/Unix Based Systems

Gzip (GNU Zip) is a command line tool used to compress and/or expand files. It comes with most of the Linux/Unix based Operating Systems. Gzip is a free software replacement for the compress program used in early Unix systems, intended for use by the GNU Project. gzip was created by Jean-Loup Gailly and Mark Adler. The compression method used by "gzip" is known as Lempel-Ziv (LZ77). Whenever possible, each file is replaced by one with the extension .gz, while keeping the same ownership modes, access and modification times. If, in case if the compressed file name is too long for its file system, gzip truncates it.
Read more »

Wget for Beginners : How to use wget in Linux/Unix Based Systems

Wget is a command-line downloader for Linux and UNIX environments. It is very powerful and versatile tool used for retrieves content from web servers and websites. Wget is freely available package and license is under GNU GPL License. With wget we can download files or even entire website. It supports the download protocols (HTTP, HTTPS, FTP and, FTPS).  It helps users to download huge chunks of data, multiple files and to do recursive downloads. Main feature of Wget of it’s robustness, and it also works well in slow or unstable network connections. Some of the features of wget are resuming of downloads, bandwidth control, authentication handling etc.
Read more »

What is Cross-Site Scripting ? | XSS Guide For Beginners

Cross Site Scripting or XSS is one of the most common web application vulnerability that allows an attacker to run his own client side scripts into web pages viewed by other users. It is a code injection attack that allows an attacker to execute malicious JavaScript in another user's browser. XSS is the most common security vulnerability in software today. In an XSS attack the attacker does not directly target his victim. Instead, he exploits a vulnerability in a website that the victim visits, in order to get the website to deliver the malicious JavaScript for him. To the victim's browser, the malicious JavaScript appears to be a legitimate part of the website, and the website has thus acted as an unintentional accomplice to the attacker.
Read more »

What is Base64 and How it works : Base64 Encoding/Decoding Guide for Beginners

Base64 is a mechanism to enable representing and transferring binary data over mediums that allow only printable characters. in other words Base64 is an encoding and decoding technique used to convert binary data to ASCII text format, and vice versa. Base64 encoding schemes are commonly used when there is a need to encode binary data that needs to be stored and transferred over media that are designed to deal with textual data. This is to ensure that the data remain intact without modification during transport. It is used to transfer data over a medium that only supports ASCII formats, such as email messages on Multipurpose Internet Mail Extension (MIME) and Extensible Markup Language (XML) data.

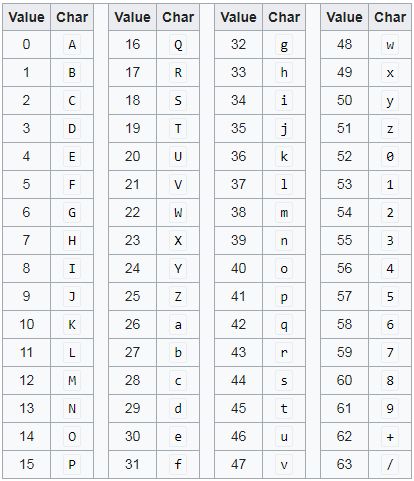
Base64 Encoding Table :

The Base64 alphabet contains a character set of 64 printable ASCII characters. The following set of characters is used to encode binary to text :


At the above table there are

  • A to Z characters  -  26 characters
  • a to z characters  -  26 characters
  • 0 to 9 - 10 characters
  • + (plus character)  - 1 character
  • / (forward-slash character)  -  1 character
  • = (equal character) - Used for Padding purposes, as explained later

Now here, since the numerals and alphabets make up for only 62 characters in all, so '+' and '/' are used to fill the gap. And also in Base64 the '=' sign is also used for filling purpose, which will explained below.


The Encoding Process :

  • 1. The Data is read from left to right.
  • 2. Three separate 8-bit data from the input are joined to make a 24-bit-long group.
  • 3. The 24-bit long group is divided into 6-bit individual groups, that is, 4 groups. The grouping into 6 bits is for the simple reason that 6 bits will cover the range of printable characters        [0-26-1 = 63]
  • 4. Each of these 4 groups of 6-bits is then encoded using the above-mentioned Base64 encoding table.
For more clarification of the Encoding process lets see the below exmaple where we encode the word 'Sec' :


Therefore, the Base64 equivalent for Sec becomes U2Vj.

Padding in Base64 :

However, a problem arises when the character groups are do not exactly form the 24-bit pattern. Consider the word Cloud, we cannot divide this word into 24-bit groups equally. Because theres only a single pair of 24-bit group (Clo), and the remaining characters 'ud', only create 16-bit. Now at here last 8-bit character is missing. Now at every missing character we append '='. So for one missing character, '=' is used; for every two missing characters '==' is used.

For example Lets see how the word 'Cloud' would be encoded into base64 :


Therefore, the Base64 equivalent for Cloud becomes Q2xvdWQ=. Similarly if there, two words is missing in the pair then we have to put two == characters in the bas64 encoded string.

Base64 Encoding/Decoding Functions :

In Javascript :

For Base64 encoding :  btoa()
 var str = 'sec-art.net';
 var encoded_string = btoa(str);
 console.log(encoded_string); 	// output is 'c2VjLWFydC5uZXQ='
For Base64 decoding : atob()
 var encoded_string = "c2VjLWFydC5uZXQ=";
 var decoded_string = atob(encoded_string);
 console.log(decoded_string);
In PHP :

For Base64 encoding : base64_encode()
 <?php
 $str = 'sec-art.net';
 echo base64_encode($str);
 ?>		
For Base64 decoding : base64_decode()
 >?php
 $str = 'c2VjLWFydC5uZXQ=';
 echo base64_decode($str);
 ?<


Conclusion :

Base-64 encoding is a way of taking binary data and turning it into text so that it's more easily transmitted in things like e-mail and HTML form data. It's a textual encoding of binary data where the resultant text has nothing but letters, numbers and the symbols "+", "/" and "=". It's a convenient way to store/transmit binary data over media that is specifically used for textual data.
Read more »

How to install Web for Pentester VM in Oracle Virtual Box

Web for Pentester is a pre-configured Virtual Machine ISO prepared for practicing Web Pentesting by PentesterLab. They also provide a course about Web penetration testing along with it. The course page can be found here. So its highly recommended to reviewing the course material to get a better understanding of the topic. This particular vulnerable VM focuses on web application pentesting and its fundamental elements. You can download the VM ISO from here.

Note : Some screenshots are small in sizes, so to saw them in big size please click on it.
Read more »

Curl for Web Hacking and Pentesting

In the previous post we saw the basic uses of curl. Now at this we are going to see some useful and important command as web pentesting view.

1. Get the HTTP response header

We can get header information of a website with '-I' flag
 curl -I http://www.w3.org
2. Sending GET Requests
 curl "http://www.testserver.com/example.php?name=hacke&age=30"
3. Sending POST requests 
 curl -d "name=ajay&submit=Submit" http://www.testserver.com/example.php
4. To follow a redirect location:
 curl -L http://www.testserver.com
5. Sending custom Headers : 
 curl -H "user-agent:Mozilla/5.0 (X11; Linux x86_64) " http://www.testserver.com
 curl -H "Content-Type: text/xml" http://www.testserver.com
 curl -H "Host: www.unknownsite.com" http://www.testserver.com
6. Custom User-Agent Header :

We can send custom user agent header by '-A' flag
 curl -A "Mozilla/5.0 (X11; Linux x86_64)" http://www.testserver.com
 curl -A "Mozilla/5.0 (compatible;  Windows NT 5.0)" http://www.testserver.com
7. Custom Referrer field :
 curl -e http://referersite.com http://www.testserver.com
Or we can also send custom referrer with below command
 curl -H "Referrer: http://referersite.com"  http://www.testserver.com
8. Custom Cookies : 

To send custom cookies use '-b' flag
 curl -b "name=sectree" http://www.testserver.com
To store response cookies in a file use '-c' option. We can also send cookies which is stored in a file.
 curl -b current_cookies.txt -c new_cookies.txt http://www.testserver.com
where the current_cookies.txt are being sent to the web server and new_cookies.txt are response cookies by the server which is stored and written in that file.


Read more »

How to use Curl in Linux : Curl Guide For beginners

Curl is a command line tool for getting or sending files using URL syntax. It is used to transfer data from or to a server, using one of the supported protocols (DICT, FILE, FTP, FTPS, GOPHER, HTTP, HTTPS, IMAP, IMAPS, LDAP, LDAPS, POP3, POP3S, RTMP, RTSP, SCP, SFTP, SMB, SMBS, SMTP, SMTPS, TELNET and TFTP). The command is designed to work without user interaction. We can use curl for download files from internet, sending custom HTTP ( GET and POST ) request, as FPT client, sending e-mails etc. Curl can be used in many different and interesting ways. Some of the main features of curl is :
Read more »

Web Scrapping with Python using BeautifulSoup module

Web Scrapping (also known as web harvesting or web data extraction ) is a technique used to extract information and data from websites. In this tutorial we are going to use a python module called beautifulSoup for web scrapping. It is very powerful python library for extract data from HTML and XML files. But note that BeautifulSoup does not send any page requests to website, so we have to do this by using other modules like urllib2, requests etc. Now first we need to install BeautifulSoup Library. To install the BeautifulSoup module use the below command :
 sudo apt-get install python-bs4
or you can also install with pip
 pip install beautifulsoup4
or in-order to install BeautifulSoup from source, Download the source from here

https://www.crummy.com/software/BeautifulSoup/bs4/download/4.6/

Then extract it and run the setup.py file
 tar xvf beautifulsoup4-x.x.tar.gz
 python setup.py install

Installing HTML Parser :

In Beautiful Soup we need to suppy an html parser to process the data. With python an html parser ('html.parser') comes built in, But we can also instal some more powerfull html parsers like xml, html5lib etc. To install below parsers use the below command :
 sudo apt-get install python-lxml
 sudo apt-get install python-html5lib
or
 pip install lxml
 pip install html5lib
The lxml parser is very fast and can be used to quickly parse given HTML. But the html5lib is a bit slow as compared to lxml, but it is also very useful parser. To clearify the difference between all the parsers, try the below code :
 $ python
 
 >>> from bs4 import BeautifulSoup
 >>> code = """<html>
 <HEAD>
 <title>This is test
 </HEAD>
 <body>
 <p>Hello world This is test</p>
 </html>"""
html.pareser :
 >>> psr1 = BeautifulSoup(code, 'html.parser')
 >>> print psr1
 <html>
 <head>
 <title>This is test
 </title></head>
 <body>
 <p>Hello world This is test</p>
 </body></html>
xml parser :
 >>> psr2 = BeautifulSoup(code, 'xml')
 >>> print psr2
 <?xml version="1.0" encoding="utf-8"?>
 <html>
 <HEAD>
 <title>This is test
 </title>
 <body>
 <p>Hello world This is test</p>
 </body></HEAD></html>
lxml parser :
 >>> psr3 = BeautifulSoup(code, 'lxml')
 >>> print psr3
 <html>
 <head>
 <title>This is test
 </title></head>
 <body>
 <p>Hello world This is test</p>
 </body></html>
html5lib parser :


Basics of beautifulSoup :

Now here are some basic example of how to use BeautifulSoup Library for Web Scrapping, we are taking a simple html code for demonstration :
 <html>
 <head>
  <title>Simple Web Page</title>
 </head>
 <body>
  <p class='heading'>Hello world : A Sample Page test</p>
  <p class='sub-heading'>This the Sub-heading or Description</p>
  <table>
    <tr>
   <th>Firstname</th><th>Lastname</th> <th>Age</th>
  </tr>
  <tr>
   <td>Frank</td><td>Castle</td><td>40</td>
    </tr>
    <tr>
   <td>Jack</td><td>Rietcher</td><td>45</td>
    </tr>
  </table>
  <a href="http://wikipedia.org/">Wikipedia</a>
  <a href="http://youtube.com">Watch Videos</a>
  <a href="http://google.com">Search Something</a>
  <a href="http://facebook.com">Find Your Friends</a>
 <body>
</html>
Store the above code in a variable in python interpreter
 code = """<html>
 <head>
  <title>Simple Web Page</title>
 </head>
 <body>
  <p class='heading'>Hello world : A Sample Page test</p>
  <p class='sub-heading'>This the Sub-heading or Description</p>
  <table>
    <tr>
    <th>Firstname</th><th>Lastname</th> <th>Age</th>
  </tr>
  <tr>
   <td>Frank</td><td>Castle</td><td>40</td>
    </tr>
    <tr>
   <td>Jack</td><td>Rietcher</td><td>45</td>
    </tr>
  </table>
  <a href="http://wikipedia.org/">Wikipedia</a>
  <a href="http://youtube.com">Watch Videos</a>
  <a href="http://google.com">Search Something</a>
  <a href="http://facebook.com">Find Your Friends</a>
 <body>
</html>"""
Now import the BeautifulSoup library :
 from bs4 import BeautifulSoup
Now create a bs4 object to parse the data, we going to use lxml parser in this example :
 soup = BeautifulSoup(code, 'lxml')
Now with the soup objects we can access all elements of the html page throgh tag names and its attributes. For example to get the title of page
 >>> soup.title
 <title>Simple Web Page</title>

 >>> soup.title.string
 u'Simple Web Page'

 >>> soup.title.name
 'title'
To get the paragraph :
  >>> soup.p
 <p class="heading">Hello world : A Sample Page test</p>
 
 >>> print soup.p.contents
 [u'Hello world : A Sample Page test']

 >>> soup.p.string
 u'Hello world : A Sample Page test'
To get all paragraph
  >>> soup.find_all('p')
 [<p class="heading">Hello world : A Sample Page test</p>, <p class="sub-heading">This the Sub-heading or Description</p>]
Extracting table information
   >>> soup.body.table
 <table>\n<tr>\n<th>Firstname</th><th>Lastname</th> <th>Age</th>\n</tr>\n<tr>\n<td>Frank</td><td>Castle</td><td>40</td>
 \n</tr>\n<tr>\n<td>Jack</td><td>Rietcher</td><td>45</td>\n</tr>\n</table>
 
 >>> soup.body.table.tr
 <tr>\n<th>Firstname</th><th>Lastname</th> <th>Age</th>\n</tr>
 
 >>> soup.body.table.tr.th
 <th>Firstname</th>
 
 >>> soup.body.table.tr.find_all('th')
 [<th>Firstname</th>, <th>Lastname</th>, <th>Age</th>]
printing all rows data in table
 >>> for dat in soup.body.table.find_all('tr'):
 ...      for ind in dat.find_all('td'):
 ...             print ind.string
 ... 
 Frank
 Castle
 40
 Jack
 Rietcher
 45
Getting link information
  >>> soup.body.a
 <a href="http://wikipedia.org/">Wikipedia</a>
 
 >>> soup.body.find_all('a')
 [<a href="http://wikipedia.org/">Wikipedia</a>, <a href="http://youtube.com">Watch Videos</a>, <a href="http://google.com">Search Something</a>, 
 <a href="http://facebook.com">Find Your Friends</a>]
print all the links :
 >>> for link in soup.body.find_all('a'):
 ...     print link['href']
 ... 
 http://wikipedia.org/
 http://youtube.com
 http://google.com
 http://facebook.com
With next_sibling and previous_sibling we can navigate between page elements that are on the same level
 >>> soup.body.p
 <p class="heading">Hello world : A Sample Page test</p>

 >>> soup.body.p.next_sibling
 u'\n'

 >>> soup.body.p.next_sibling.next_sibling
 <p class="sub-heading">This the Sub-heading or Description</p>

Parsing a Webpage with urllib2 and BeautifulSoup :

first imoprt all the necessary libraries
 from bs4 import BeautifulSoup
 import urllib2
Now to get the page, send the get request to the page url https://www.w3.org, and parse it with BeautifulSoup
 page = urllib2.urlopen("https://www.w3.org")
 soup = BeautifulSoup(page, 'lxml')
Now get the title of the page
 >>> soup.title.string
 u'World Wide Web Consortium (W3C)'

 >>> soup.body.p
 <p class="bct"><span class="skip"><a accesskey="2" href="#w3c_most-recently" tabindex="1" title="Skip to content (e.g., when browsing via audio)">Skip</a></span></p>

Harvesting all the links
 >>> for link in soup.find_all('a'):
 ...     print link['href']
 ... 
 /
 /standards/
 /participate/
 ------------
 -----------
 https://www.w3.org/WAI/videos/standards-and-benefits.html
 https://www.w3.org/WAI/videos/standards-and-benefits.html
 http://lists.w3.org/Archives/Public/site-comments/
 http://twitter.com/W3C
 http://www.csail.mit.edu/
 http://www.ercim.eu/
 http://www.keio.ac.jp/
 http://ev.buaa.edu.cn/
Printing all the text from page :
 print (soup.get_text())
And with like the above we can collect information by parsing the web pages.

Conclusion :

The BeautifulSoup is very powerful library to parse the HTML and XML documents and collecting data from it. At above we saw some very basic example of how to use it. And For more detail information please check the documentation page at here : Official Documentation
Read more »

A Beginners Guide to requests Library in Python : How to Use requests library in Python

Most existing Python modules for sending HTTP requests are extremely verbose and cumbersome. Python’s builtin urllib2 module provides most of the HTTP capabilities you should need, but the api is thoroughly broken. It requires an enormous amount of work (even method overrides) to perform the simplest of tasks.
Read more »

How to use urllib2 module in Python : A Beginners guide to urllib2 module

urllib2 is a Python module for fetching URLs. It offers a very simple interface, in the form of the urlopen function.  The urllib2 is capable of fetching URLs using a variety of different protocols and it also supports slightly complex interface for handling common situations - like basic authentication, cookies, proxies and so on. 
Read more »