
In this post we will go through all the Cross Site Scripting ( XSS ) example, and try to exploit them .

1. Cross-site-Scripting - Reflected (GET) :
The both input box are vulnerable to xss. Put the below payload on one of the input box.
Payload :
<script>alert(1)</script>
2. Cross-site-Scripting - Reflected (POST) :
The both input box are vulnerable to xss. Put the payload on one of the input box.
Payload :
<script>alert(1)</script>3. Cross-site-Scripting - Reflected (JSON) :
The response of the web app will just printed out by the JavaScript in the JavaScript tag.

So we can bypass it by just closing the current JavaScript statement and injecting new line of our malicious code. The payload is
"}]}';alert(1);</script>
4. Cross-site-Scripting - Reflected (AJAX/JSON) :
At here the JavaScript payload did not work. So we need to use payload with html events.
Payload :
<img src=x onerror=alert(1)> <svg onload=alert(1)>5. Cross-site-Scripting - Reflected (AJAX/XML) :
At here the normal payload as we used in the above example did not work, but when we encode the above payload with html encoding then it worked.
Payload :


6. Cross-site-Scripting - Reflected (Back Button) :
In this challenge , when the user click on the back button then the JavaScript code will use the referrer header to go back to the previous page. So in this situation if we can modify the referrer header then when we click on the back button then our payload is executed.
Now to modify the referrer header we need to use browser proxy like burp suite. Start burp proxy (or other), change the proxy settings of your browser, then choose the page(back button chellange page)

and in burp proxy replace the referrer header data with this
Payload :
';alert(1);'
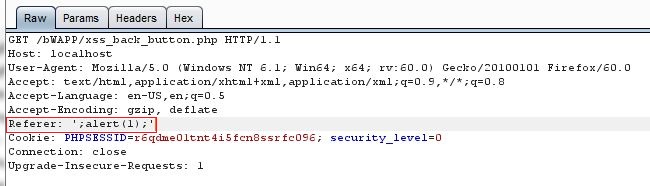
And when we click on the back button, then the payload will executed.
7. Cross-site-Scripting - Reflected (Custom Header) :
At this challenge we need to add the custom header in the request head for challenge page by using browser proxy server.
Payload :
bWAPP: <script>alert(1)</script>
Now at the challenge page, payload will executed.
8. Cross-site-Scripting - Reflected (Eval) :
At this challenge we can direct execute our payload by just putting iot on the url at date=payload at address bar
Payload :
alert(1)
192.168.56.102/BWAPP/xss_eval.php?date=alert(1)9. Cross-site-Scripting - Reflected (HREF) :
At this page the provided data will be printed on the next page but the it is parsed with html parser.


But at the link for vote it is not parsed or filtered so at here we can execute our payload. So put the below payload into the first page and then it will execute on the 2nd page.
Payload :
><script>alert(1)</script><
10. Cross-site-Scripting - Reflected (PHP_SELF) :
At this page the both input field is vulnerable to XSS.
Payload :
<script>alert(1)</script>11. Cross-site-Scripting - Reflected (Referrer) :
In this page the content or referrer header field will display on the page. So just need to replace the referrer header field with the payload and at the target page it will be executed.
Payload :
<script>alert(1)</script>
12. Cross-site-Scripting - Reflected (User-Agent) :
In this page the content or User-Agent header field will display on the page. So we just need to replace the User-Agent header field with the payload and at the target page it will be executed.
Payload :
<script>alert(1)</script>
13. Cross-site-Scripting - Stored (Blog) :
At this page the supplied user input will display on the page.

So we just need to put the payload in the text box and click submit button. after that it store the code into the page, whenever you visit that page then the code will be executed.
Payload :
<script>alert(1)</script>14. Cross-site-Scripting - Stored (Change Secret) :
At this page when we put some data in the input field then nothing happens, but when we look at the source code of the page then there will be a hidden input field named login,

So if we edit the code of the page and change this input field type from hidden to text then we are able to change its value and inject our payload into its value field which is echoed on the page. To do this right click on the input box and click on Inspect Element option

then in inspector console first change the input filed type from hidden to text,


and on the modified page, put the below payload :
Payload :
"><svg onload=alert(1)><"
15. Cross-site-Scripting - Stored (User-Agent) :
In this page replace the User-Agent header field with the payload and at the target page it will be executed. In this page the content or User-Agent header field will display on the page. So we just need to replace the User-Agent header field with the payload.
Payload :
<script>alert(1)</script>
And when the user visits the page next time then payload will execute.
Conclusion :
In this post we saw the XSS vulnerabilities example given in the bWAPP wab app. For more information about Web Security and Web Pentesting, please visit the below link :
http://www.sec-art.net/p/web-security.html
And For installation Process of bWAPP in windows with XAMPP : Click here